
A low water level in your home’s well pump likely means the pump needs priming.
Air leaks or trapped air in the water pump often prevent the formation of a vacuum needed to pull water effectively. This issue often occurs if the pump hasn’t been used or maintained properly for a long time, or if it is a new installation.
If you are facing this problem, you can easily prime your well pump by following our guide.
Step-by-Step Guide to Priming a Water Well Pump
Priming your well pump is essential to maintaining its efficiency, which ensures that your pump is drawing water properly and that there are no other blockages.
Here’s a detailed and comprehensive guide to help you through the process, ensuring you understand each step clearly.
1. Turn Off the Power to the Pump
Before starting any work on your well pump, safety should always be your top priority.
- Why Turn Off the Power?
- Avoid Electrical Shock: Working on a pump with the power on can be extremely dangerous and may leave you seriously injured or even dead.
- Prevent Accidental Activation: If you mistakenly prime the pump while the power is on, it may damage or blow up the mechanical system of the pump and may result in loss of life and property.
- How to Turn Off the Power:
- Locate the Breaker Panel: The power supply to the pump is usually controlled through a circuit breaker or switch.
- Flip the Breaker: Turn off the specific breaker that controls the pump’s power. This ensures the pump won’t accidentally activate while you’re working on it.
2. Release System Pressure
The next step is to relieve any pressure built up within the system to make the priming process safer and more effective.
- Why Release Pressure?
- Prevent Water Spillage: When you open the system, releasing pressure ensures that there is no water leakage, preventing unnecessary messes or water wastage.
- Ensure Safety: Built-up pressure can cause water to shoot out unexpectedly when you open valves or fittings. Releasing pressure makes it safer to handle the system.
- How to Release Pressure:
- Open Faucets or Valves: Open a faucet or relief valve near the well pump. Doing so will release any pressure built up in the pipes.
- Check the Pressure Gauge: Most systems have a pressure gauge that shows the current pressure in the tank. Make sure the pressure is at or near zero before continuing.
3. Locate the Priming Port
Understanding the components of your pump is key. The priming port is where you will add water to the pump to remove any air pockets.
- Why is the Priming Port Important?
- The priming port allows you to fill the pump and suction line with water. This water pushes out any air trapped in the pump, which can otherwise prevent it from functioning properly.
- How to Find the Priming Port:
- Pump Manual: The priming port is located right on top of the pump or near the suction line. If you still have any problems, you can refer to the manual.
- Common Location: In many cases, it’s on the side of the pump’s housing or attached to the suction line itself. If you can’t find it right away, check for a small screw-on plug.
4. Remove the Priming Plug
The priming plug prevents water from escaping after you add it. Removing it is essential to allow water to enter the pump.
- Why Remove the Plug?
- Access for Water: The plug must be removed to allow water to flow into the pump. Without removing it, the pump can’t fill up with water, and the priming process will be ineffective.
- Inspect for Pressure: By removing the plug you can easily check for any residual pressure in the system. If despite this the pump is still pressurized then the best option is to open it completely.
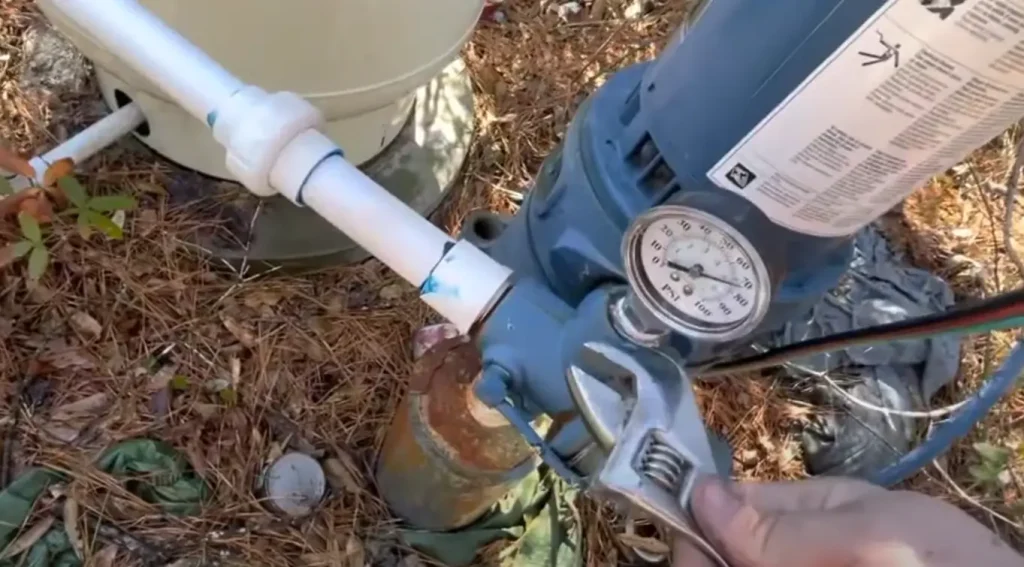
- How to Remove the Priming Plug:
- Use a Wrench: Typically, you’ll need a wrench to unscrew the priming plug. Ensure the tool fits securely so you don’t strip the threads.
- Check for Residual Water: When you unscrew the plug, a small amount of water might spill out. Be prepared with towels or a rag to absorb any mess.
5. Inspect the Pump and Suction Line for Debris and Damage
Before adding water, check for any obstructions or issues in the system that could affect the efficiency of the priming process.
- Why Inspect the Pump and Line?
- Prevent Blockages: Dirt, debris, or even small stones can clog the suction line, hindering the pump’s ability to draw water properly. These blockages must be removed before proceeding.
- Ensure Functionality: This is also the time to look for any signs of wear, cracks, or loose fittings in the suction line or pump components. Fixing these issues before priming will save time and trouble.
- How to Inspect:
- Check for Clogs: Look for visible debris or mud around the priming port or suction line. If you find any obstructions, remove them before continuing.
- Tighten Loose Fittings: Inspect all fittings along the suction line for any looseness. Tighten them with a wrench to prevent air from entering the system during priming.
6. Fill the Pump with Water
Now, you can begin filling the pump and suction line with clean water to eliminate the air pockets.
- Why Fill the Pump with Water?
- Displace Air Pockets: Filling the pump with water ensures that air is pushed out of the system, enabling the pump to create the necessary vacuum to draw water.
- Prevent Damage: If you don’t fill the pump properly, the air inside can cause the pump to run dry, which may lead to overheating or permanent damage.
- How to Fill the Pump:
- Use a Bucket or Hose: You can use a bucket or hose filled with clean water. A bucket is useful if you don’t have a direct water line near the pump, while a hose can provide a continuous flow.
- Fill Slowly: Begin pouring the water slowly into the priming port. If you’re using a bucket, a funnel can help you pour the water neatly and avoid spilling.
- Look for Overflow: Keep filling the port until you see the water begin to overflow. This means that the air in the pump and suction line has been completely displaced by the water.
7. Replace the Priming Plug
Once the pump is filled with water, the next step is to secure everything and ensure no air can enter the system.
- Why Replace the Plug?
- Seal the System: Replacing the priming plug creates a seal to prevent air from re-entering the system and affecting the pump’s operation.
- Prevent Water Loss: Tightening the plug ensures that the water you added won’t leak out when you restore the power.
- How to Replace the Plug:
- Wrap with Teflon Tape: Before screwing the priming plug back in, wrap Teflon tape around its threads to ensure a tight, leak-proof seal.
- Tighten the Plug: Screw the plug back into the priming port. Be careful not to overtighten, as this could damage the threads or make it difficult to remove the plug later.
8. Restore Power to the Pump
After securing the priming plug, the next step is to reconnect the power and start the pump.
- Why Restore Power?
- Activate the Pump: Turning the power back on triggers the pump to begin working again. With the system primed, the pump should be able to draw water and begin delivering it to your home.
- How to Restore Power:
- Go to the Breaker Box: Return to the breaker box and flip the switch back on to restore power to the well pump.
- Wait for Activation: You should hear the pump start shortly after. If the pump doesn’t activate, double-check the power connection and ensure the breaker is fully switched on.
9. Test the Pump for Functionality
After restoring the power, test the pump to ensure it’s functioning correctly.
- Why Test the Pump?
- Check for Water Flow: Open a faucet or hose bib near the pump to ensure water is flowing. If the pump is primed successfully, water should begin to flow without interruption.
- Look for Unusual Noises: Listen carefully for any strange sounds, such as grinding or rattling. These noises could indicate mechanical issues or that the pump is still not fully primed.
- How to Test the Pump:
- Check for Steady Water Flow: If water flows consistently and steadily from the faucet, the pump is working as expected.
- Observe Water Pressure: Check the water pressure as well. It should be strong and stable. If there are fluctuations, it may indicate the pump still has air in the system or there’s another issue.
Troubleshooting Common Issues
Even with proper steps, some problems may arise:
- Airlocks: Persistent air pockets may indicate leaks or improper sealing of the priming plug.
- Leaking Connections: Inspect all fittings and joints for signs of leakage and tighten or replace them as needed.
- Faulty Components: If priming fails repeatedly, check the foot valve, check valve, or impeller for damage.
Preventative Maintenance for Your Well Pump
Regular maintenance helps ensure the longevity and efficiency of your pump:
- Inspect Regularly: Check for cracks, leaks, or wear on the pump and suction line every few months.
- Keep the Area Clean: Prevent dirt, debris, and vegetation from accumulating around the wellhead.
- Monitor Water Levels: Be aware of seasonal changes or overuse that could lower the water table in your area.
- Winterize Your Pump: Insulate the pump and pipes during colder months to prevent freezing and cracking.
- Schedule Professional Inspections: Have a licensed technician inspect your system annually to identify potential issues before they escalate.
Why Do Pumps Lose Their Prime?
Understanding the causes behind a loss of prime is essential for preventing future issues.
1. Air Leaks
- Cracked pipes or loose fittings in the suction line allow air to enter.
- Damaged seals or gaskets can also be culprits.
2. Low Water Levels in the Well
- A drop in the water table or excessive pumping can lower the water level below the pump’s intake point.
3. Debris Accumulation
- Dirt, sand, or organic matter can clog the pump or suction line, blocking water flow.
4. Faulty Check Valve or Foot Valve
- A damaged valve can allow water to drain back into the well, introducing air into the system.
5. Power Interruptions
- Sudden power outages can disrupt the pump’s operation, leading to a loss of prime.
Signs That Your Pump Needs Priming
- No water flow from faucets.
- Fluctuating or inconsistent water pressure.
- The pump runs continuously but fails to deliver water.
- Unusual noises such as sputtering or gurgling.
Tools You’ll Need
Having the right tools and materials ensures a smooth and effective priming process:
- Wrench: For loosening and tightening fittings and plugs.
- Clean Water: At least a bucket or hose for filling the pump.
- Funnel: To pour water neatly into the priming port.
- Teflon Tape: To seal threads and prevent air leaks.
- Towels or Rags: For cleaning up spills and drying the area.
For a deeper dive into the importance of shape and design in everyday infrastructure, like how manhole covers are round to prevent accidents, check out our post on the technical reasons behind it.
Frequently Asked Questions
Priming is only needed when the pump loses its prime. Regular maintenance can minimize the frequency of priming.
Always use clean, debris-free water to prevent clogging the system.
Inspect for air leaks, blockages, or faulty components. If the issue persists, consult a professional.